
You don’t have to be a woodworker to make your own wooden Christmas tree! Review these steps to see how we built this tree, then let your creativity take over — adjust the wood dimensions to fit your space, stain the wood to fit your style, and display your tree indoors as a statement piece or outdoors to add rustic charm to your yard.
PREPARE: Always work in a well-ventilated area and cover your workspace with a drop cloth to protect it from the stain. If this is your first time staining wood, we recommend learning how to apply wood stain before you get started.
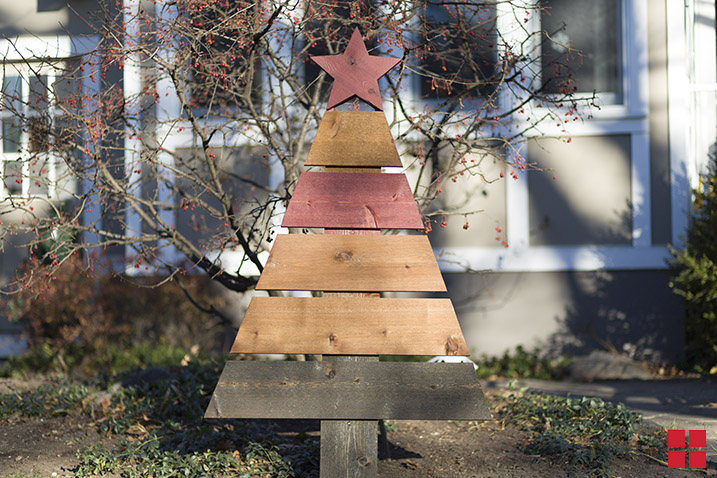
CUT: Set down one plank of cedar so that it’s laying flat vertically. This will be the "spine" of your tree. Then, evenly space your remaining five planks horizontally on the spine. Leave about 1 inch between each plank and 1 foot of space at the bottom of the spine.
Place the star at the top of the spine. Then, use a yardstick to draw an angled line from the bottom of the tree to the top, using the star as your ending point. This line will be your guide for cutting the boards. Your bottom, largest plank should be about 36 inches wide once it’s cut, and the top board should be as wide as the star. Use your yardstick to draw another equally angled line on the other side of the tree.
With your pencil lines as a guide, use your jigsaw to cut an angled edge on each plank of cedar.
SAND: Once all your boards are cut to size, lightly sand the surface of each piece of wood, working your way up through 120-, 150- and 180-grit sandpaper. Be sure to wipe away the sanding dust with a tack cloth in between each sanding and once more after you've completed sanding. Once the boards are completely sanded and clean of any dust, it's time to start staining.
STAIN: For a festive effect, we used four different wood stain colors throughout the tree. To get started, first stir or shake your first color of Varathane Premium Fast Dry Wood Stain thoroughly. Dip your brush or lint-free rag into the stain and apply a liberal amount onto the wood. Work in manageable sections, like one plank at a time. Once you’ve covered one plank, let the stain sit for a few minutes to soak into the wood.
Now that the stain has had time to soak in, remove any excess with a clean lint-free rag. Always wipe with the direction of the wood grain. Repeat this step with each plank, varying your stain colors, and then let your planks dry for one hour.
TOPCOAT: If your tree will be displayed outdoors, you’ll want to protect it from weathering with a topcoat of spar varnish.First, stir (do not shake) your can of Varathane Ultimate Spar Urethane thoroughly. Using your clean brush, apply a coat of the varnish to each board, using light and even strokes. Apply three coats of the varnish, waiting 2-3 hours in between each coat. Once each piece of wood is coated, set the boards aside to dry for 24 hours.
BUILD: To assemble your tree, re-align your planks horizontally in the Christmas tree pattern. Make sure you leave about 1 inch between each board. Use a drill and nails to attach your longest plank — the spine of the tree — to the back of the boards. The top of the spine should align with the top of the smallest plank. Once the planks are all attached, use wood glue to adhere the star to the top of your tree. Let the glue dry according to the label’s instructions.
Now that your one-of-a-kind wooden Christmas tree is completely assembled and dry, display it in your home or front yard to bring a hint of rustic charm to your Christmas décor.
Other Materials:
- 6 Planks of Cedar Wood 8” X 48”
- Wooden Star
- High Quality Synthetic Bristle Brush
- Sandpaper (#120, #150, #180 Grits)
- Tack Cloth
- Drop cloth
- Lint-Free Rag or Cloth
- Screws
- Drill
- Jig Saw
- Yardstick
- Pencil
- Wood Glue

